Showing posts with label Real World Cases. Show all posts

Monday, April 20, 2009

Oracle R 12 GL Implementation - Auto Offset in Payables works even if Dist Acct’s Balancing Segment belongs to a different Legal Entity

R12 Functionality:

1. Primary Ledger can be associated with Multiple Secondary Ledgers
2. Primary Ledger can be assigned to Multiple Legal Entities
3. Primary Ledger can be assigned to Multiple Operating Units
4. An Operating Unit is tied to the Primary Ledger through the Legal Entity Context
5. Specific Balancing Segment Values are assigned to specific Legal Entities in the Primary Ledger
6. Payables supports the auto offset features wherein the Balancing Segment of the Trade Liability Acct will equal the Dist Acct’s Balancing Segment
7. Payables allows the selection of Balancing Segment values not assigned to the Legal Entity that owns the Operating Unit in the Distribution Window
8. Accordingly, it also allows the selection of the corresponding balancing segment when it builds the Trade Liability Account
9. Question: What is the specific purpose of assigning Balancing Segment Values to the Legal Entity in Accounting Manager Setup (as once assigned, the same value is not allowed to be selected for any other Legal Entity), if this value is usable for the Operating Unit(s) that does not have this Legal Entity Context?

Summary of key facts:

1. Common COA Structure used for Primary and Secondary Ledgers
2. Ledger shared by Multiple Legal Entities
3. Specific Balancing Segment Values assigned to Specific Legal Entity (Overlap not allowed)
4. Specific Legal Entity Vision Operations Assigned to Payables Manager OU for Legal Entity Context
5. User preference set to Access Vision Operations OU by Default in Payables

Conclusion and Findings:

1. Balancing Segment Value Assignment to the Multiple Legal Entities, sharing the same Ledger does not seem to restrict the user of these Balancing Segment Values in the Feeder, Operating Unit specific Modules Like AP, wherein Legal Entity Context is passed to the OU through the link of the Primary Ledger
2. However, access to these Balancing Segment Values could be controlled through Security Rules being assigned to the Value Set and the Respective Responsibility
3. The Key question is: If Legal Entity having the context to the Operating Unit that shares the common Ledger does not have assignment to it, what impact it has on the integrity of data when this access is otherwise allowed, except through Security Rules?

Saturday, May 17, 2008

Inventory Flexfield Structure Definition for a Food Processing and Distribution Company

Introduction - This real world case study on proposed item structure for a Food Processing and Distribution Company was based on the requirements of business, gathered through discussions during the implmentation project, as well as recommendations submitted by consultants.


1. Objective

The Decision on Inventory Flex fields Structure was taken based on achieving the following Objective:

Ø Item code structure across all Product lines & Products is required to be uniform;
Ø Item code should be simple and short;
Ø Item code numbering should be driven by a simple logic to avoid deciphering the codes by field staff;
Ø Item code should be independent of the personal view of the person defining the item;
Ø Item code should not be dependent on either supplier or customer codes;
Ø Each item should have code and a description to identify the item uniquely;
Ø Code should not be repeated in description and vice-versa;
Ø Expiry date and location of the item should be identified
Ø All items should be properly classified in a logical manner, so that MIS reports can be generated; and
Ø All existing reporting requirements are met, in addition to the reports available in Oracle Inventory.

In Oracle Inventory, an Item should have a System Flex field; in order to take advantage of the Oracle Apps, features, it is also recommended to use Category Sets, Lot number control and Locator to define an Item.

Based on the above, the following item code structure was designed.

2. System Item Flexfield

The System Item Flex field is used to define the Item Code through which an Item in the Inventory is identified uniquely. For the client's business, the System Item Flex field will be:

No. Of segment = 1
Segment Name = Item

Size = 6 Numeric

The segment will have serial no starting from 000001 to 999999. This gives flexibility to have 999999 items in the company. To ensure that items are numbered in a logical manner, range of serial no. will be allocated, so that serial no. can be used only from the range.

As a next step, Description of the item has to be entered to save the item in the system. It is proposed that the name of the supplier/brand, existing description and the package size shall be entered in description, eg. ABC Supplier (Brand), Mod Chicken (Description) and 900 grams (package size) so the description would be 'ABC Supplier Mod Chicken 900 Grams'.

3.Category Set

A Category is a logical major classification of items that have similar characteristics. A Category Set is a set of distinct categories in which an Item can be grouped/classified. E.g. one grouping or classification can be based on “Buying”; another grouping or classification for the same Items can be based on the Physical Inventory attributes. The flexibility of having multiple category sets allows reporting and query on items in a way that best suits business needs.

For our common business requirements across all departments, an Inventory Category Set will be created at the beginning with the following four segments:


*The segment size has been considered keeping in view that most of the business requirements are met. As these 6 segments are required to appear in Reports, GRNs, PO & Invoices hence, having longer size would mean that on the reports, other information might not fit in 80-column Or 128 column Stationery.. However, in system their full description can be entered and maintained. It is also advisable that these categories can be numbered properly to avoid extending the report size.

The values for the above 6 segments will have to be first updated and combinations also created. This will then be available as List of Values (LOV). Every time an item is created, this default category set structure will be attached to the Item, and the values for each of the segments can be selected from LOV. Few items have been classified under four segments:

Once a Category set is attached to an item, reports on its segments i.e. Focus, Brand, Category, Base Product, Product & Size can be generated. For an existing item, a Category set can be delineated, if required, and a new category set attached. Last change audit trail will be available in the system. A new category set can also be created or an existing Category set be disabled.

4. Lot Control

Lot control feature can be utilized to capture the expiry of items in the inventory. It plays a crucial role in the organizations, which are into Food Processing, Pharmaceutical and products that get expired due to elapse of time. It is proposed that the lot control feature can be enabled and used for all products. Basically, system will require a lot number and expiry date to be entered by the user to complete the transaction. Transactions are as follows:

A. Material Receipts
B. Transfer goods from one location to another location and
C. Material Issues

In case of material transfer between locations, user has to choose the lot number, which is already assigned to the items. This will eliminate multiple lot numbers assigned to single item in different locations for a better control. To ease the operations, it is proposed that the ETA date (Expected Time of Arrival) shall be entered as lot number for the item and the user has to input expiry date of the item. Preferably, these lot numbers should be pasted on the Pallets so that the inventory clerk can easily identify the location of the goods.

5. Locator Structure (To be used in Future)

Locators are used to identify physical location where the item is actually stored in the Warehouse/Store. Locator can track item quantity. An Item can also be restricted to a specific locator or a locator can be dynamically assigned to the item on receipt.


In order to use this available feature for better managing the inventory, we need to –
Ø Design the locator storage system based on the warehouse space and use structure for storing items.
Ø Paint the palettes using standard primary colors.
Ø Assign numbers to all the palettes.
Ø Define all the locator addresses in the Inventory system.
Ø Attach item to a locator.

It is proposed to use a Locator segment of Colour & Number, for e.g. R120 would mean RED colour palette number 120. This detail will help in tracking the item during transfers, issues and also during taking physical stock of the items. Proposed locator address structure is given below:


It is proposed that the locator will be defined in the system but the users will be using it once they are well versed with the system. The locators segment have to entered on following transactions:

A. Material Receipt to Warehouses
B. Transfer of goods from one location to another location
C. Movement of Goods within the warehouse
D. Issue of materials to Customers and Vans
E. Receipt of materials from Van and Customers

6. Benefits of the Proposed Item Structure

a. At the time of Item creation, the only User logic built into the item code is the Sub Division to which the item belongs.
b. The Item Code is short with one segment and is uniform across all Products.
c. Company can have up to 999999 items.
d. The Item Code is not dependent on the item code of the Vendor or Customer and is unique to the Client.
e. The probability of making duplicate item code is nil since the Item Code is unique in inventory. f. Items have been classified in an Inventory Category Set with six segments Type, Product Line, Brand and Product. In the existing system the classification is more or less the same. Focus, Brand, Category, Base Product, Product & Size will be available as List of Values for selection, so that typographical errors are avoided. However, it is important that the selection is correct to avoid changing the category subsequently.
g. Inventory Reports can be generated on any of the segments i.e. Item Code, Description, Focus, Brand, Category, Base Product, Product & Size to sort the items in Inventory Organization.
h. An Item can be attached with lot numbers & Locator to identify the location and expiry dates.
i. Stocks can be maintained Expiry date wise

Tuesday, April 15, 2008

Implementing iExpenses for a Global Professional Services Firm (Part 1)

Client and Business Case - Global Professional Services Firm executing projects globally wanted to implement Oracle Internet Expenses to support employee expense reporting and reimbursement. Oracle iExpenses was implemented to enable Client employees to independently enter and submit their expense reports on-line, real time, utilizing a standard Web browser or a Web-enabled mobile device. Oracle Workflow was configured to automatically routes expense reports for approval and enforce reimbursement policies. Oracle iExpenses integrates with Oracle Payables and Oracle Projects to provide quick processing of expense reports for payment.

Key Features implemented - The implementation of iExpense enabled the client to benefit from the following functionalities:

1. Enable employees to record, and submit expense reports using a standard Web browser.

2. Provide employees a “disconnected solution” when access to a corporate intranet is not available.

3. Use Descriptive Flexfields to enter additional information about expense related receipts not otherwise captured in the Expense Template.

4. Define multiple Expense Templates. Employees can choose from a List of Values the Expense Template(s) available.

5. Define Expense Templates, and indicate whether an original receipt is required for the expense type so employees are aware of the original receipts requirement.

6. Use Oracle Workflow with Oracle Web Expense to automatically route expense reports for approval, and enforce reimbursement policies.

7. Use Oracle Web Expense to seamlessly integrate with Oracle Payables so expense reports can be quickly processed for payment.

8. Create “Authorized Delegates” to authorize a user to enter expense reports for another employee. (i.e., An executive assistant is given the authority to enter expense reports for their manager.)

9. Indicate in the Expense Template if original receipts are required.

10. Allow employees to enter negative receipts to report refunds, or credits against their reported expenses.


High Level Business Flow:


Key Components of the implementation:


In my next post, I will try and expand on each of the key components implemented above.

Monday, April 14, 2008

AP Check fraud prevention in Oracle Apps - Payee Match with Positive Pay

Client and Business Case – A large multinational corporation wanted to implement a very tight check fraud prevention tool while implementing Oracle Payables. This was because of the reason that with today’s technology, it has become much easier for individuals to commit check fraud. The corporation was concerned with the recent increase in check fraud activity perpetrated against itself, hence they needed a more effective fraud-fighting tool within Oracle Apps.

Solution - In order to reduce Client’s susceptibility to check fraud, Payee Match was implemented. Payee Match is a tool used by corporations and financial institutions to match the amount and serial numbers on checks as well as the name of the payee given out in the “Payee Zone” on the check.

Payee Match service works independently of the Positive Pay Service. It matches all the data in the “Payee Zone” on the face of Client’s checks. This service usually works in conjunction with the Positive Pay service.While Positive Pay verifies the amount and the serial numbers of the check Payee Match provides a third line of defense against check fraud by verifying the payee name and address. Payee Match matches a file, sent by the Client, to the checks presented for payment at the bank. The Client will have the choice to pay or reject any non-matched items.

Payee Match generates pay or no pay alerts on the following data elements:
a) Issued date
b) Serial Number
c) Amount
d) Transit Number
e) Bank Identifier
f) Account Number
g) Payee Name
h) Payee Address.

High level Solution Steps:
1. Develop a Custom Positive Payee match Report in Oracle to include all the data elements of Payee Match as per the structure required by the Client.
2. Run the Positive Payee Match Report
3. Format the text file generated by the Positive Payee Match Report as per the format agreed to with the banks.
4. Custom Scheduler Process --FTP the file to the desired location in the server as per the bank’s specification
5. Bank will tabulate and send the results of payments by payee detailing the count for each pay cycle in a text file to the desired location on the FTP Server.
6. Custom Scheduler Process will grab the text file sent by bank from the designated location and sends it to the desired location on the Oracle server.

Detailed User Procedures:
In order to achieve the payee match solution the following steps need to be performed:
1. Development of a custom report on the lines of the standard Positive Payee Match report in Oracle.
2. Run the report and format the resulting text file as per the bank’s format.
3. Custom Scheduler Program will extract the file from the oracle server and FTP it to the FTP server from where the bank can download the same. This will be on a daily basis with at least one pay cycle per day throughout the week beginning from Sunday and ending on Friday.
4. Need to create an image map of Client check stock; anything inside the image map is called the “Payee Zone”. The Payee Zone is read using OCR technology and converted into a text string, with each element being separated by a space. All punctuation and white space is removed from the string. All information contained in the Payee Name Zone of the physical check must be included in the fields “Check Sequence 1” through “Check Sequence 10” in order of appearance on the physical check (top to bottom, left to right.)
5. Once the scanned data is converted to a text string, the matching software combines all of the Check Sequence fields from the Client issued file into a string, and separates each field element with a space. It then compares this string to the scanned data from the check. This comparison identifies any discrepancies that may have been caused by fraudulent activity. If any discrepancies are detected between the two strings, the check is examined manually. If it is determined that the mismatch is not caused by a computer error, then Client is notified of the discrepancy with a pay / no pay decision, via email or fax.


6. The Bank will upload the file with the count of the payments in the particular pay cycle to the FTP server from where the custom scheduler program can retrieve and send it over to the designated location in the Oracle server.

Thursday, April 10, 2008

Accounting for Refunds within Oracle Payables

Refund Scenario - A supplier will send a request for a deposit of prepayment to the Accounts Payable group. The following is a basic overview of the standard account suggested by Oracle for the entry of a prepayment with a refund from the supplier.

1. Enter a prepayment invoice to the supplier.

Prepayment Account (default) - DR.
Liability Account - CR.

2. Pay the prepayment invoice to the supplier.

Liability Account - DR.
Cash Clearing Account - CR.

3. Reconcile payment in cash management.

Cash Clearing Account - DR.
Cash Account - CR.

The supplier sends a refund check for ‘some amount’ (XX) of the original prepayment.
___________________________________________________________________________________________

4. The Accounts Payable person enters a ‘dummy’ invoice with invoice number ‘Refund XXXXX’ in the amount of the refund.

Expense Account DR. ******Cash Account workaround.
Liability Account CR.

5. Match the invoice to the original prepayment invoice.

Liability Account DR.
Prepayment Account (default) CR.

___________________________________________________________________________________________
At this point, the refund has never been officially recorded in Payables or in Cash Management. The refund will not show any or Oracle’s standard reports. Oracle’s standard process for recording refunds of prepayments includes an additional step to record the refund in Payables and in Cash Management.

6. The Accounts Payable person enters a ‘dummy’ Debit Memo.

Liability Account DR.
Expense Account CR.

7. The debit memo is ‘paid’ with the entry of the refund check.

Cash Clearing DR.
Liability Account CR.

8. The refund is reconciled through Cash Management

Cash DR.
Cash Clearing CR.
___________________________________________________________________________________________
******The Cash account can be used for logging the payment to the correct GL account. However, there are no provisions to have the refund show up on the AP standard reports or to be cleared through Cash Management.

Monday, April 7, 2008

Retrospective Payroll Processing in Oracle Payroll

Client and Business Case - A global manufacturing company wanted to automate the retrospective pay calculation in Oracle Payroll for critical payroll processes like retrospective pay awards, temporary promotions, secondments, retro pay for part timers etc.

Solution - Oracle Payroll allows you to make back pay adjustments through the RetroPay process. Key points include:
–Inputs to pay that were originally correct have now changed retroactively.
–You receive late notifications of promotions.
–You can run the RetroPay process from the submit Requests window.

How Retro Pay Works - Oracle Payroll now rolls back and reprocesses all the payrolls for the assignment set from the date you specified. The system compares the old balance values with the new ones and creates entry values for the RetroPay elements based on the difference. These entries are processed for the assignments in the subsequent payroll run for your current period.
No changes are made to your audited payroll data.

Configuration - All payroll elements configured during the implementation are assessed for whether they are “retropay’able” or not. Usually all regular payments and allowances are considered eligible for retropay. Voluntary deductions and some non-recurring payments are not normally eligible but can be made so if required.

For each eligible element a corresponding “Retropay Element” is also configured. These elements will hold the results of any pay adjustments calculated by the “Retropay” process.

A number of Retropay element “Groups” may also be configured. I.e. There will almost certainly be a group which includes all eligible elements but there could be another group which is just for bonus related adjustments. This gives flexibility when running retropay to restrict the process to just those items where you are notified that a change is due.

Operational steps - Immediately prior to every payroll calculation the “Retropay Notifications” report should be run. This lists any system changes that indicate a retrospective adjustment may be due. E.g. One or more employees may have had a late or corrected entry of a new allowance, change of Grade, change of Grade Step placement etc.

Using the “Retropay Notifications” report you can establish the assignments, period and elements for which retrospection is needed.

If a retrospective calculation is needed, then run the standard “Retropay by Element” process.
Input parameters are :-
Assignment set – if you want to restrict the run to selected assignments
Retropay element group – if you want to restrict the run to selected elements
Start date – this is the earliest date you want the system to recalculate from
End date – this is the latest date you want the system to recalculate up to

The process recalculates for the assignments, period and elements indicated. Any resulting adjustments are attributed to each relevant retropay element and entered into the current pay period for processing in the full payroll gross to nett run. In this way the results of the previous period(s) payrolls are not amended. The adjustments will only affect values and be costed in the current payroll period.

How the notification process works - During the implementation “Dynamic Triggers” will be configured. These identify when a change has occurred in the database which could mean an adjustment to pay is needed. E.g. There will be dynamic triggers to detect changes in Grade, Spinal Point, Standard Hours, Contract Type, FTE, Allowances etc. The “Retrospective Notifications” process uses these triggers to notify you of the items which need retrospective calculation.

How the calculation process works - Assume a retropay run is for March and April with the adjustments to be paid in May. The system retrieves all balances for the assignment as at end of February payroll and notionally recalculates all eligible elements for March and April. These notional element results are compared by the system with the original actual results in March and April for the same elements. Any differences are automatically entered onto the relevant retropay element in May. The end result will be exactly the same as if a payroll clerk had manually calculated the adjustments needed and manually keyed them onto adjustment elements in the current pay period.

Optimising use of the Retropay functionality - It can be seen that as the exact same system process is used to recalculate as was used in the original payroll calculation, then elements which have derived values will automatically be correctly recalculated by the retropay process.

e.g.
Allowance X has a formula attached which specifies that the allowance value is 10% of basic salary plus 2% of all contractual allowances. If basic salary and all contractual allowances are part of the retropay set then Allowance X will also be recalculated.

If the allowance has no formula and is populated by a user keying in an arbitrary amount then it will not be affected by retropay on other elements. The only way this would generate a retropay adjustment would be if the original allowance entry were changed, i.e. different start/end date or value.

During the implementation, due consideration should be given to how elements are configured to enable maximum use of the retropay functionality.

Pay Awards - When revising the values on a pay scale due to a pay award it will be essential to datetrack to the correct effective date when the new values come/came into force. You can apply the pay award in advance of the effective date or after it. If it is applied late then restrospective calculations will be due and the operational steps outlined above will need to be followed. If you have applied the pay award in advance then the old rates will be applied until the effective date of the pay award when the new rates will automatically be applied. If this occurs mid-period then the calculated values will be pro-rated accordingly.

Temporary Promotions, Secondments etc. - Any employee who is in a role which is not their usual substantive assignment will still be eligible for retropay adjustments on their substantive assignment for the period before their Temporary Promotion or Secondment started, and also on their extra assignment for the Promotion or Secondment.

Part Timers - It can be seen that as the exact same system process is used to recalculate as was used in the original payroll calculation, then elements which are pro-rated according to a part-timers FTE will still be pro-rated in exactly the same way.

Overlapping Retrospective Runs - It is possible that having run Retropay in June to recalculate March-May, you then have reason to run it in September for April-August. This is perfectly legitimate and the system will correctly process the second retropay run which overlaps the time period covered by the first run.

Saturday, April 5, 2008

Posting Payroll Costs to General Ledger

Client and Business Case - A Banking Client who had implemented a full installation of HR (including payroll processing) wanted to configure the system such that the payroll costs are posted periodically to the General Ledger.

High Level Solution - There is a Key FlexField (KFF) in Oracle Payroll called “Cost Allocation Flexfield”. Like any other KFF it must be setup to contain segments that together represent the full analysis code to be used in posting payroll costs to General Ledger (GL).


This KFF also uses Qualifiers to determine where each segment is made accessible to the user.


There are 5 different places in the standard Oracle HRMS application where Costing information can be configured by the user. This is true for any Oracle HRMS customer.

The 5 places are :-

1. Payroll – Each active payroll must have segments setup for Costing and Suspense. This is normally maintained by technical Payroll Sysadmin staff.

Navigation = HR Responsibility > Payroll > Description:


2. Element Link – All Elements which pay/deduct money must have at least one link created. The number of links for each element and their complexity is dependent on how Finance requires the postings in GL. Each link has 2 costing flexfields, one for the Debit and one for the Credit entry in GL. Each of these 2 records may need one or more of the Cost Allocation KFF segments populated. This is normally maintained by technical Payroll Sysadmin staff.

Navigation = HR Responsibility > Total Compensation > Basic > Link:


3. Organization – Each Organization may have a single costing record populated with one or more segments. This works most effectively where each HR Org can be directly related to a particular GL Cost Centre. This is normally maintained by HR Sysadmin staff.

Navigation = HR Responsibility >Work Structures > Organization> Description:


4. Employee Assignment – Each Employee Assignment may have multiple costing records populated with one or more segments. This is where split % costing’s applied. This is normally maintained by HR Operational staff.
Navigation = HR Responsibility >People> Enter and Maintain > Assignment > Salary Information > Others > Costing:


5. Employee Assignment Element Entry (sometimes called Element Entry Overrides) – Each element entry may have a single costing record populated with one or more segments. e.g. Time entries from Timesheets. This is normally entered by Payroll Operational staff.

Navigation = HR Responsibility >People> Enter and Maintain > Assignment > Salary Information > Entries:


6. Final Setup
There is one final setup step to map the CostAllocation Flexfield segments to the corresponding segments in the GL Chart of Accounts KFF.


High Level Costing Process:

There are two report processes available.
1. Cost Breakdown Report for Costing Run
2. Cost Breakdown Report for Date Range
These reports simply select a set of payroll calculation results according to run parameters and report on them.

There is one process for collecting Payroll costs.
3. Costing - This process collects a set of payroll calculation results, attributes them to the full GL analysis code and creates an output file in the correct format for posting to GL. The file can be viewed via the normal view process results function.

There is one process for transferring the costs.
4. Transfer to GL - This process takes the results file and moves it to a designated area on the file server from where it can be uploaded to GL under the control of an authorised GL user.

There is one process for retrospective costing adjustments.
5. RetroCosting Process - This process recalculates costs and compares the results with the original costing process results to identify and differences.

Understanding Mass Additions

Client and Business Case - One of my clients (Oil and Gas - Retail) who implemented Oracle Assets needed a simpler way to:
1. Convert Fixed Assets data from legacy system for Go-Live
2. Add new assets or cost adjustments from other (Oracle or Non Oracle) systems to the Oracle Assets system automatically without reentering the data

Mass Additions - The Mass Additions process lets you:
1. Load (convert) assets automatically from an external source. You can review new mass addition lines created from external sources before posting them to Oracle Assets. You can also delete unwanted mass addition lines to clean up the system.
2. You can also load (convert) asset data into Oracle Assets using the Create Assets Feature in the Applications Desktop Integrator (ADI), which allows you to import data from an Excel spreadsheet.
3. Maintian Assets data - The mass additions process lets you periodically add new assets or cost adjustments from other systems (like Oracle AP, Oracle Projects ) to your Asset system automatically without reentering the data.

Mass Additions Features:

1. Review Mass Additions - Clients can review newly created mass addition lines for entering additional mass addition source, descriptive, and depreciation information, assign the mass addition to one or more distributions, or change existing distributions. Once the mass addition is ready to become an asset, change the queue to POST. On Posting Mass to FA this mass addition becomes an asset. The Mass Additions post program defaults depreciation rules from the asset category, book, and date placed in service which can be overridden

2. Add to Existing Asset - Clients can add a mass addition line to an existing asset as a cost adjustment. Choose whether to change the category and description of the existing asset
to those of the mass addition and whether to amortize or expense the cost adjustment. When one changes the queue name to POST for a mass addition line which is being added to an existing asset, the queue name is changed to COST ADJUSTMENT. This makes it easy to differentiate between adding a new asset or adjusting an existing asset.

3. Merge Mass Additions - Clients can merge separate mass addition lines into a single mass addition line with a single cost. The mass addition line becomes a single asset when one
Posts Mass Additions. One can only merge mass additions in the NEW, ON HOLD, or user–defined hold queues. Choose whether to sum the number of units. When one posts the merged line, the asset cost is the total merged cost.

4. Split Mass Additions - Clients can split a mass addition line with multiple units into several single unit lines. The original line is put in the SPLIT queue as an audit trail of the split. The resulting split mass additions appear with one unit each, and with the same existing information from the source system. Each split child is now in the ON HOLD queue which can be reviewed to become a separate asset.

5. Post Mass Additions to FA - Use the Post Mass Additions to FA program to create assets from mass addition lines in the POST queue using the data entered in the Mass Additions window. It also adds mass additions in the COST ADJUSTMENT queue to existing assets.

6. Clean Up Mass Additions -The Delete Mass Additions program removes mass addition lines in the following queues:
• Mass additions in the SPLIT queue for which child mass addition lines created by the split has already been posted.
• Mass additions in the POSTED queue that have already become assets
• Mass additions in the DELETE queue.

7. Create Mass Additions from Invoice Distributions in Payables - Mass Additions adds assets and cost adjustments directly into FA from invoice information in Payables. The Create Mass Additions for Oracle Assets process sends valid invoice line distributions and associated discounts from Payables to an interface table in FA. One reviews them in and determines whether to create assets from the lines.

Pre-requisites steps for seemless Mass Additions Process:

1. Register the Accounts - Account Type Must Be Asset: Register the clearing accounts to be used as Asset accounts. The create mass additions process selects Payables invoice line distributions charged to clearing accounts with the type of Asset.
Define Valid Clearing Accounts in FA: For each asset category in FA for which invoice line distributions are to be imported from Payables, define valid asset clearing and construction–in–process clearing accounts. These accounts must be of type Asset. The create mass additions
process only imports lines charged to accounts that are already set up in asset categories.

2. Define Items with Asset Categories - Clients can define a default asset category for an item in Purchasing or Inventory. Then when one purchases and pays for one of these items using
Purchasing and Payables, the mass additions process defaults this asset category. If mass addition lines for an item are to appear in FA with an asset category, Cleints must:
• Define a default asset category for an item in the Item window in Purchasing or Inventory
• Create a purchase order for that item
• Receive the item in either Purchasing or Inventory
• Enter an invoice in Payables and match it to the outstanding purchase order
• Approve the invoice and Post the invoice to GL
After cleint runs create mass additions, the mass addition line appears with the asset category specified for the item.

3. Enter Invoices in Payables - While entering a new invoice in AP, charge the distribution to a clearing account that is already assigned to an asset category. The line amount can be either positive or negative.

4. Units - If one enters a PO with multiple units and match it completely to an invoice in payables, the Create Mass Additions process uses the number of units specified by the original PO for the mass addition line. Mass addition lines created from invoices entered directly into AP without matching to a PO default to one unit. After one approves and posts the invoice in AP, run the Create Mass Additions process to send valid invoice line distributions to FA.

5. Handle Returns: Clients can easily process and track returns using mass additions.

6. Conditions For Asset / Expensed Invoice Line Distributions To Be Imported - For the mass additions create process to import an invoice line distribution to FA, these specific conditions must be met:
• The line is charged to an account set up as an Asset account. (Expense in case of expense asset)
• The account is set up for an existing asset category as either the asset clearing account or the CIP clearing account
• The Track As Asset check box is checked. (It is automatically checked if the account is an Asset account)
• The invoice is approved and The invoice line distribution is posted to Oracle GL from AP
• The GL date on the invoice line distribution is on or before the date specified for the create program
• AP must be tied to the same GL SOB as the corporate book for which one want to create mass additions

7. Running the Create Mass Additions For FA Program in Payables - Clients can run Create Mass Additions for FA as many times as during a period. Each time it sends potential asset invoice line distributions to FA. AP ensures that it does not bring over the same line twice.

Thursday, March 27, 2008

How to create Custom Address Styles in Oracle Apps

Client – Clients who are having Global Rollouts and need for multiple address styles.

Business Case – Need to add country specific address style formats for addresses information which are stored in the different core modules of Oracle Apps including Receivables (for Customer and Remit to Addresses), Payables (Supplier and Payment Addresses), Banks (Bank Branch addresses)

Out of the box address styles - Oracle Applications provides one default and five predefined address styles. These address styles cover the basic entry requirements of many countries. The different address styles provided out of the box are:
• Default,
• Japanese,
• Northern European and Southern European,
• South American,
• United Kingdom/Asia/Australasia,
• United States

How to add a new Address Style -

Let us say the client has a Business requirement to add a new address style for ‘Canada’. The following high level steps can be followed to define this new ‘Canada’ address style.

1. Choose address style database columns for your ‘Canada’ address style.

First you need to decide (as per client’s requirements) which columns from the database you are going to use and how you are going to order them. All the seeded address styles include the following database columns and some additional columns.

• Bank Addresses
• AP_BANK_BRANCHES.ADDRESS_LINE1
• AP_BANK_BRANCHES.CITY
• AP_BANK_BRANCHES.STATE
• AP_BANK_BRANCHES.ZIP

• Customer and Remit-To Addresses
• HZ_LOCATIONS.ADDRESS1
• HZ_LOCATIONS.CITY
• HZ_LOCATIONS.POSTAL_CODE
• HZ_LOCATIONS.STATE

• Supplier Addresses
• PO_VENDOR_SITES.ADDRESS_LINE1
• PO_VENDOR_SITES.CITY
• PO_VENDOR_SITES.STATE
• PO_VENDOR_SITES.ZIP

• Payment Addresses
• AP_CHECKS.ADDRESS_LINE1
• AP_CHECKS.CITY
• AP_CHECKS.STATE
• AP_CHECKS.ZIP

For example, in the Japanese address style, the address element called Province maps onto the STATE database column and that in the United Kingdom/Africa/Australasia address style the address element called County also maps onto the STATE database column. Oracle recommends that all custom address styles also include at least the above database columns because these address columns are used extensively throughout Oracle for printing and displaying.
Note: Most reports do not display the PROVINCE, COUNTY, or ADDRESS4/ADDRESS_LINE4 database columns for addresses.

The following screenshot gives you an idea of how to setup database columns for your ‘Canada’ address style:


2. Define ’Canada’ address style to database columns using Define Descriptive Flexfield Segments Window.

Next step is to create a new context value for each of the descriptive flexfields.

Payables – Bank Address:


Payables – Site Address:


Receivables – Address:


Receivables - Remit Address Information:


3. Add address style to the address style lookup:

Add the ‘Canada’ address style name to the Address Style Special lookup so that you will be able to assign the style to countries and territories.

To add a new style to the address style lookup:
A. Using the Application Developer responsibility, navigate to Applications > Lookups > Application Object Library.
B. Query the ADDRESS_STYLE lookup.
Receivables displays all of the address styles used by Flexible Addresses.
C. Add your new ‘Canada’ address style, as follows:


D. Enable this style by checking the Enabled check box.

4. Assign the address style to the appropriate country using the Countries and Territories window.

· Using Receivable or Payables Superuser responsibility navigate to Setup > System > Countries. · Query for Country = ‘Canada’
· Attach the ‘Canada’ Address Style created to the Canada Country
· Save the record


5. This completes the setup for the new ‘Canada’ address style, now you can use this new address style while adding new Canada Customers, Suppliers etc. See screenshot below on how the Customer Form displays the new ‘Canada’ address style:


Click on the Address filed and you will get a popup window with the new ‘Canada’ address style:

Wednesday, March 19, 2008

Intercompany Setups and Sample Transaction Processing using Oracle Projects

Client Industry – Professional Services Firm implementing Oracle Project Accounting which has Global Operations.

Business Case – Canadian employee travels to US to work on a US project. Canadian employee needs to bill time and expenses for the US Project and the US Project Manager has to pay the Canadian office for the Canadian employees work on the US project.

Setups to support Intercompany Billing:
The setup steps are divided into the following phases:
Global Setup:
• Define transfer price rules
• Define transfer price schedules
• Define additional expenditure types, agreement types, billing cycles, invoice formats, and supplier types
• Define an internal supplier
• Define an internal customer
Operating Unit Setup:
• Define supplier sites for the internal supplier (receiver)
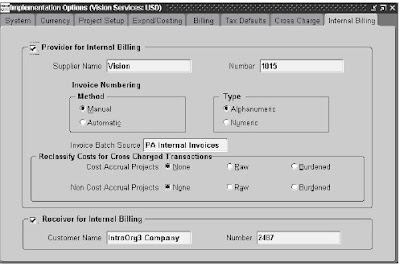
• Define bill to and ship to sites for the internal customer (provider)
• Define internal billing implementation options (each operating unit)


• Define internal tax codes for Receivables invoices (provider)
• Define internal tax codes for Payables invoices (receiver)
• Define an agreement for intercompany billing projects
• Dene a Project Type for Intercompany Billing Projects
• Dene Project Templates for Intercompany Billing Projects
• Dene Intercompany Billing Projects (receiver)
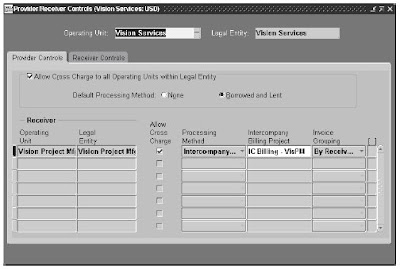
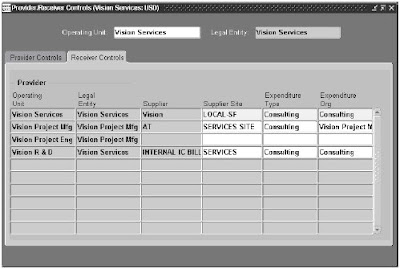
• Dene Provider and Receiver Controls
Provide Controls:

Receiver Controls:

• Dene AutoAccounting for Intercompany Billing Transactions

Steps to process Intercompany Transactions for Contract Projects (Canada = Provider OU, US = Receiver OU):

1. Receiver OU - Create/ Approve Contract. Enter "Employee Bill Rate and Discount Overrides" at the Project/ Task Level for Provider Employee’s
2. Provider OU - Employee enters time against Receiver OU Project
3. Provide OU - Time Card is approved
4. Provider OU - Employee enters & submits expenses against Receiver OU Project
5. Provider OU - Expense is approved are processed in AP
6. Provider OU - Run Transaction Import (Timecards), Interface Expense Reports to PA, Distribute Labor Costs
7. Receiver OU - Generate Draft Revenue
8. Provider OU - Review Proj Func Burdened, Labor, Expense Report Cost/ Accounts
9. Receiver OU - Verify Labor Revenue A/C, Expense Revenue A/C
10. Receiver OU - Run Project WIP Report (on demand), Project Manager reviews WIP Report and Attests Revenue
11. Receiver OU - Generate Draft Invoice, Approve & Release Draft Invoice
12. Receiver OU - Interface to AR, Review BPA Invoice, Run BPA Master Print Program to print invoice, Mail Invoice to Customer
13. Provide OU – Generate, Approve and Release Intercompany Invoice
14. Provide OU – Interface Intercompany Invoice to Receivables
15. Provide OU - Verify Intercompany Receivables / Revenue Account, Invoice Tax Account
16. Receiver OU – Run Payables Intercompany Invoices Interface Import, AP Post , Payables Transfer to GL, Validate Accounts

Friday, March 7, 2008

The 'X' Factor

'X' Concept - One of my clients wanted to get a Trial Balance in the US Sets of Books which will only have Transactions which are entered in US dollars. As per the standard Oracle functionality, if the transaction currency is the same as the SOB functional currency, the Entered Dr and Entered Cr columns are not populated. Only the Accounted Dr and Accounted Cr columns are populated. This creates an issue as the client wants to run a trial balance on transactions entered only in SOB functional currency.


High Level Solution - 'X' currency, to overcome this, a solution was developed to use a currency called ‘X’ as the USD books reporting currency. If we take USD (Primary SOB) and USX (Reporting SOB), all transactions in USD in USD SOB will appear as a transaction currency in the USX SOB (foreign currency transaction). This will enable the user to run foreign currency Trial Balance in the USX books on transactions entered in USD.

Monday, March 3, 2008

Lockbox Reconciliation Extension

Client Industry – Applicable to all clients implementing/ implemented AR Auto Lockbox

Business Case – Client wants to be able to handle lockbox reconciliation advance cash receipts and receipt matching in EBS by reading from the receipt lines present in the electronic version of the bank statements received from the bank. Client needs an automated way to match the detailed lockbox receipts in the Oracle A/R module to the summary level deposit information processed through the BAI2 file in the Oracle Cash Management module

Solution – A custom auto lockbox reconcile extension was developed which will match the detailed lockbox receipts in the Oracle A/R module to the summary level deposit information processed through the BAI2 file in the Oracle Cash Management module. The Cash Management module matches the receipt transaction in the A/R module to the BAI2 bank statement file and creates an appropriate accounting entry in General Ledger when the amounts are different.

An additional custom form developed will store all the accounting reference into the GL Account code column for discount, charge back, bank charges item types for both lockbox and credit / debit card settlements. The Custom Lockbox Reconciliation program will derive the account and create an accounting entry in General Ledger to reconcile the receipt.

Detailed Approach - When BAI2 files are received from the Bank they are processed in the Cash Management module. The Custom Lockbox Reconciliation will match the sum of all the receipt amount for the AR receipts batch in (AR_Cash_Receipts) with the net amount received in the Bank.

On a daily basis, the lockbox reconciliation extension will process and check the bank statement transaction details and match based on the unique identifiers with receipts in Receivables, it will create an accounting in GL for difference amount of receipt from bank deposit and accounting entries for any charge.

Saturday, February 23, 2008

Currency Exchange Rate Interface

Client Industry - Applicable to clients implementing Oracle General Ledger

Business Case - Almost all clients who implement Oracle General Ledger make use of the currency exchange rate interface, since it provides a convenient and automated way for multicurrency processing within Oracle Apps. Many clients make use of this interface to report financials in a common currency as well as to perform inter-company transactions between companies that have 2 different functional currencies.

Solution – A simple custom interface program can be written which will import rates automatically from a vendor and will also load these rates into the core GL daily rates table using the delivered daily rates interface tables. Find below a high-level process flowchart which can be used as a starting point to design this interface:

1. Request file is sent to Vendor (Reuters, Bloomberg, Oanda).
2. The encrypted file “XXGLDAILYRATES_XXXX.txt” from the vendor is obtained where XXXX is “mmdd”.
3. If the file is available, continue step 4 thro 11. Else, go to step 12.
4. Invoke the Shell script to decrypt the file and load the data from the file into the daily rates interface table .
5. Call the concurrent program “Program - Daily Rates Import and Calculation”
6. Load the daily rates from interface table into Oracle base tables till the end of next fiscal month.
7. Calculate the Period average rates.
8. Load the period rates into the interface table (gl_daily_rates_interface) and Call the concurrent program “Program - Daily Rates Import and Calculation” to load the period rates from interface table into Oracle base tables.
9. Calculate the Period average and end rates for NON - US currencies.
10. Load the period average and end rates into Oracle base tables (gl_translation_rates)
11. Archive the decrypted data file as “XXGLDAILYRATES_XXXX.txt” in ARCHIVE/inbound folder where XXXX is “mmdd”.
12. Page the Finance on-call support.

Friday, February 22, 2008

Month End Close Dashboard

Client Industry - Applicable to all using Oracle Apps

Month End Close Dashboard - One of my client's accouting department wanted to know the close status of GL and other Sub-Ledgers in a single screen in Oracle. Currently Oracle does not have the funtionality to display month end close status collectively for all installed applications in a single screen. Hence a custom form was developed to acheive this functionality.

Business Case - Client needed a form for viewing the close status of P&L and Balance Sheet accounts for each Company in Oracle General Ledger in a Dashboard. The Dashboard will reflect the close status of Oracle Sub-ledgers as well. A Custom Closing Process Dashboard will need to be developed which will be used by the Accounting department for monitoring the close process in Oracle Financials and initiate requisite action based on certain key reports.

Solution Overview - We developed a custom Closing Process Dashboard which will be utilized by Accounting users to monitor the following during close process in the Various Primary Set of Books:
GL Status
View legal entity-wise P&L and Balance Sheet close status for the period selected.

· P&L Accounts
o User to view the P&L close schedule for each legal entity based on the local site closing time
o User to view the P&L close Status for each legal entity in comparison to the close schedule based on the local site’s closing time
o The three Statuses for P&L accounts are as below :
§ Open: P&L accounts fall within the closing schedule
§ Open and Action Required: Journal entries with P&L accounts do not fall within the closing schedule and there are suspense account balances & / or unapproved journals for P&L accounts
§ Close: Journal entries with P&L accounts do not fall within the closing schedule and there are neither suspense account balances nor unapproved journals for P&L accounts
o Display the reason for non-closure (Suspense Accounts and / or Unapproved Journals) of P&L accounts


· Balance Sheet Accounts
o User to view the Balance Sheet close schedule for each legal entity selected based on the local site closing time.
o User to view the Balance Sheet close Status for each legal entity as compared to the close schedule
o The three Statuses for Balance Sheet accounts are as below:
§ Open: Balance Sheet accounts fall within the closing schedule
§ Open and Action Required: Journal entries with Balance Sheet accounts do not fall within the closing schedule and there are suspense account balances & / or unapproved journals for Balance Sheet accounts
§ Close: Journal entries with Balance Sheet accounts do not fall within the closing schedule and there are neither suspense account balances nor unapproved journals for Balance Sheet accounts
o Display the reason for non-closure (Suspense Accounts and / or Unapproved Journals) of Balance Sheet accounts

Sub-Ledger Status
· Legal Entity Level
o User to view the GL period Status for each legal entity and Set of Book and also the close status of all Sub-ledgers for the period selected
· Set of Book Level
o User to view at a Set of Book level the close status of each Oracle Sub-Ledger for the selected period


Suspense Account Balances
· View suspense account balances by legal entity for functional and transactional currency showing MTD, QTD and YTD for both Standard and Average balances
· Suspense account balance reports to be generated everyday and sent to Site & Corporate Approver based on legal entity


Unapproved Journals
· Report to View Unapproved Journals at a Journal Batch level
· Unapproved journal entries report to be generated everyday and sent to Site & Corporate Approver based on legal entity

Audit Reports
· User to view the GL Status details in the form of a report for record / audit purposes

Daily Close and End of Day Reporting

Client Industry - Banking and Financial Institution

Summary - One of my banking clients had a business need to enhance end of day reporting by using a new "processing date" field, by preventing posting of future dated transactions, and storing daily balances to support end of day reporting requirements.

Standard Functionality Limitations - since Oracle General Ledger (GL) is a real-time system, the standard posting functionality will update the account balances of detail and summary accounts. When you post to an earlier effective date or open period, actual balances roll forward through the latest open period. If you post a journal entry into a prior year, Oracle GL adjusts your retained earnings balance for the effect on your income and expense accounts. End of day reporting is complicated with a single instance and server time stamp worldwide.

Business Case - Banks and Financial Institutions in US are regulated Corporations subject to daily, weekly, monthly, quarterly and annual report requirements as defined by the SEC, the Federal Reserve, and IRS. Additionally, the global branches and subsidiaries are subject to foreign regulatory agencies. These banks requires that the Oracle Financials Application's GL support the requirement that transaction processing be cut off based on an end of day and reporting generated as a result of that end of day. Currently, the standard functionality of Oracle GL does not support the concept of end of day. The Open/Close is controlled by Accounting Periods in months, not days.

Solution Overview: A custom solution was developed incorporating three types of changes that are required to support end of day processing requirements:
- Add Processing Date
- Store Daily Balances
- Prevent future dated transactions from affecting end of day balances